Tools of the Trade: Pastry Blender

10 Feb

Even if you’re lazy like me and don’t make your own pie pastry, a pastry blender can be a very helpful kitchen gadget to have around. Pastry blenders are designed to act like a bunch of coordinated knives to ‘cut’ fat (butter, shortening, lard, etc.) into a flour mixture.

Given that I’m about to post two recipes that require the use of a pastry blender, I thought I’d talk about how to pick a good quality tool.

You might remember your mom or grandma having something like this…  The problem with this style is that the tines can easily get bent out of shape and the handle isn’t stable enough to provide enough force to be efficient.

You want to look for something that has an oval grip (vs. round) and rigid metal tines. You want to make sure that the grip is solid and doesn’t roll (like grandma’s was prone to doing). Ergonomics is key! You’ll also want to make sure it’s dishwasher safe because cleaning between the tines is a pain in the ass.

Mine is similar to this Cuisipro from Amazon.com. As usual, Oxo makes a pretty good version as well.

Even though it’s not something you’ll use every day, I guarantee getting an updated pastry blender (or having one period) will exponentially decrease the amount of swearing you’ll do the next time you attempt a pastry or crumb topping.

Recipe: Garlic Baked Chicken & Potatoes

9 Feb

This dish is so cheap, so easy and so full of flavour that it’s hard for it not to become a favourite. It’s based on traditional Lebanese flavourings called ‘toum, zait w haamid’. Translated from Arabic that’s garlic (toum), zait (oil), haamid (lemon). Here, this tangy combo covers potatoes and cheap bone-in chicken (legs & thighs work best) for a hearty winter meal. It’s probably not a good pick for Valentine’s Day, but we really like it.

Garlic Baked Chicken & Potatoes

Garlic Baked Chicken & Potatoes | baconavecbacon.com

6-10 pieces of bone-in chicken
3-5 medium potatoes, peeled and sliced in 1/2 inch thick discs
20 cloves of garlic, peeled
1 cup lemon juice
4 tablespoons olive oil
salt
1 teaspoon shawarma style spices (available at your friendly neighbourhood Arabic grocery store)

This recipe is easily scaled to fit your family. Depending on how much chicken you’re using, use either a 9×9 or a 9×13 baking dish. Arrange the chicken in the bottom and make cuts in the flesh with a sharp knife. (This will help the sauce to soak in later.) Rub the chicken with a couple of tablespoons of oil, salt and the shawarma style spices.

Take the sliced and peeled potatoes and zap them in the microwave for 4 minutes. This helps to soften them so they’ll be done at the same time as the chicken. Then toss them on top of the chicken and salt lightly.

Throw the dish into the oven and bake at 400 degrees for about 50 minutes.

In the meantime, break out your blender or food processor. Add the garlic, 1/2 teaspoon salt, and 2-3 tablespoons of olive oil and blitz the garlic until smooth (4-5 minutes). Add the lemon juice and blitz for another 4-5 minutes.

When the chicken is done (use a meat thermometer to be sure) pour the sauce overtop of the potatoes and chicken and stir to cover all of the pieces. Switch the oven to broil and bake for another 10-15 minutes or until the potatoes start to brown nicely.

Serve with a nice fresh salad.

Recipe: Mom’s Quiche

2 Feb

Both of my parents are pretty good cooks and a good portion of the ‘secret’ recipes I have kicking around are things they made regularly when I was growing up.  I’ve tweaked a few of them over the years and this quiche is one of our favourites.

My mother of course makes her crust from scratch which I can’t be bothered to do so I instead use a deep dish pre-fab frozen crust. Her recipe simply calls for cheese and broccoli as add ins, but of course I had to put bacon in mine. Feel free to experiment – feta, red pepper and chicken, mushroom and swiss, smoked salmon…  The options are endless!

Mom’s Quiche

Mom's Quiche | baconavecbacon.com

1 frozen deep dish pie crust
1 cup cheddar cheese, shredded
1 cup chopped frozen spinach, drained
1/2 cup pre-cooked crumbled bacon (I like Kirkland brand from Costco)
1 brick cream cheese, softened
1/4 cup milk
4 eggs
1 tablespoon chives
1 teaspoon salt
1 tablespoon parmesan cheese
dash of paprika

Sprinkle the cheese in the bottom of the pie crust. Arrange the rest of your ingredients on top. Beat the cream cheese and milk until smooth. Add in the eggs one at a time. Stir in the salt and chives. Spoon the egg mixture over your toppings. Sprinkle the top with the parmesan cheese and the paprika.

Bake for 45 minutes at 375 degrees.

Taste Test: Al Safa Beef Chapli Kabab

1 Feb

So I had seen the green boxes of beef chapli kabab in the grocery store many times before.

I hadn’t ever picked any up because frankly I wasn’t quite sure what to expect. When I saw FreshCo had them on sale this week for $3.99 for a box of 8 and with nothing planned for dinner, I figured I’d give them a shot.

According to the wikipedia entry on all things kabab, the chapli version is popular in Pakistan and Afghanistan and usually consists of beef or lamb mince with veggies, spices and herbs that is shaped and grilled like a hamburger. In fact, chapli comes from the Pashto word Chaprikh which means flat.

The package directions gives you the option to pan fry, grill or heat the patties in the oven. With the frigid temperatures outside and wanting to avoid extra fat, I opted for the latter. Most of the recipes I had seen called for them to be served with a size of minted yogurt sauce and salad so I opted to make my greek yogurt and dill dip (subbing mint for dill) and my shawarma salad as sides. I had mine loose on the plate while Mr. Bacon opted to make his into a sandwich with a pita.

We were both pleasantly surprised at how tasty and tender these were. Very savoury with familiar Middle Eastern flavours and a nice hit of spice. They’ll for sure be making regular appearances in our kitchen. An added bonus – despite being pre-fabricated and frozen – the label only had REAL ingredients listed. Nothing unpronounceable.

I can’t wait till spring to try them as a hamburger!

Recipe: Chocolate & Peanut Butter Snack Cake

27 Jan

What goes together better than peanut butter and chocolate? If you answered nothing, you are correct. This cake is no exception. It’s dense and rich but not overly sweet. It is necessary to pair this with a big glass of milk because the peanut butter layer is quite sticky!

The recipe I used for this is from here and it’s supposed to be like a brand of snack cakes available in the Eastern US. I can’t vouch for accuracy having never enjoyed a TastyCake but I can confirm the tastyness!

The next time I try this, I might cheat and make the base with a yellow cake mix and blend the peanut butter with some marshmallow fluff to make it a bit sweeter and less dense.

Chocolate & Peanut Butter Snack Cake

Chocolate Peanut Butter Snack Cake | baconavecbacon.com

4 eggs
1 teaspoon vanilla
1/4 teaspoon salt
2 cups sugar
2 teaspoons baking powder
2 cups flour
1 cup milk
2 teaspoons melted butter
1 bag milk chocolate chips
2 cups creamy peanut butter

Preheat your oven to 350 degrees. Butter and flour a 9×13 pan.

In the microwave warm the milk and the butter until melted and set aside to cool.

In a large bowl, mix the eggs, vanilla, salt, sugar, baking powder and flour. Add the milk and stir until smooth. Pour the batter into the floured pan and bake for approximately 30-35 minutes or until a toothpick inserted in the middle comes out clean.

Immediately spread the peanut butter over top of the cake. As it melts it’ll become easier to move around. Once spread, put the cake into the fridge until the peanut butter sets.

Once the PB layer is set, in a microwaveable bowl, melt the chocolate chips. Pour over top of the peanut butter layer and spread carefully. Place the cake back into the fridge until the chocolate layer sets.

When you’re ready to eat the cake, let it come to room temperature before cutting, otherwise the chocolate will crack.


Recipe: Homestyle Lasagna

27 Jan

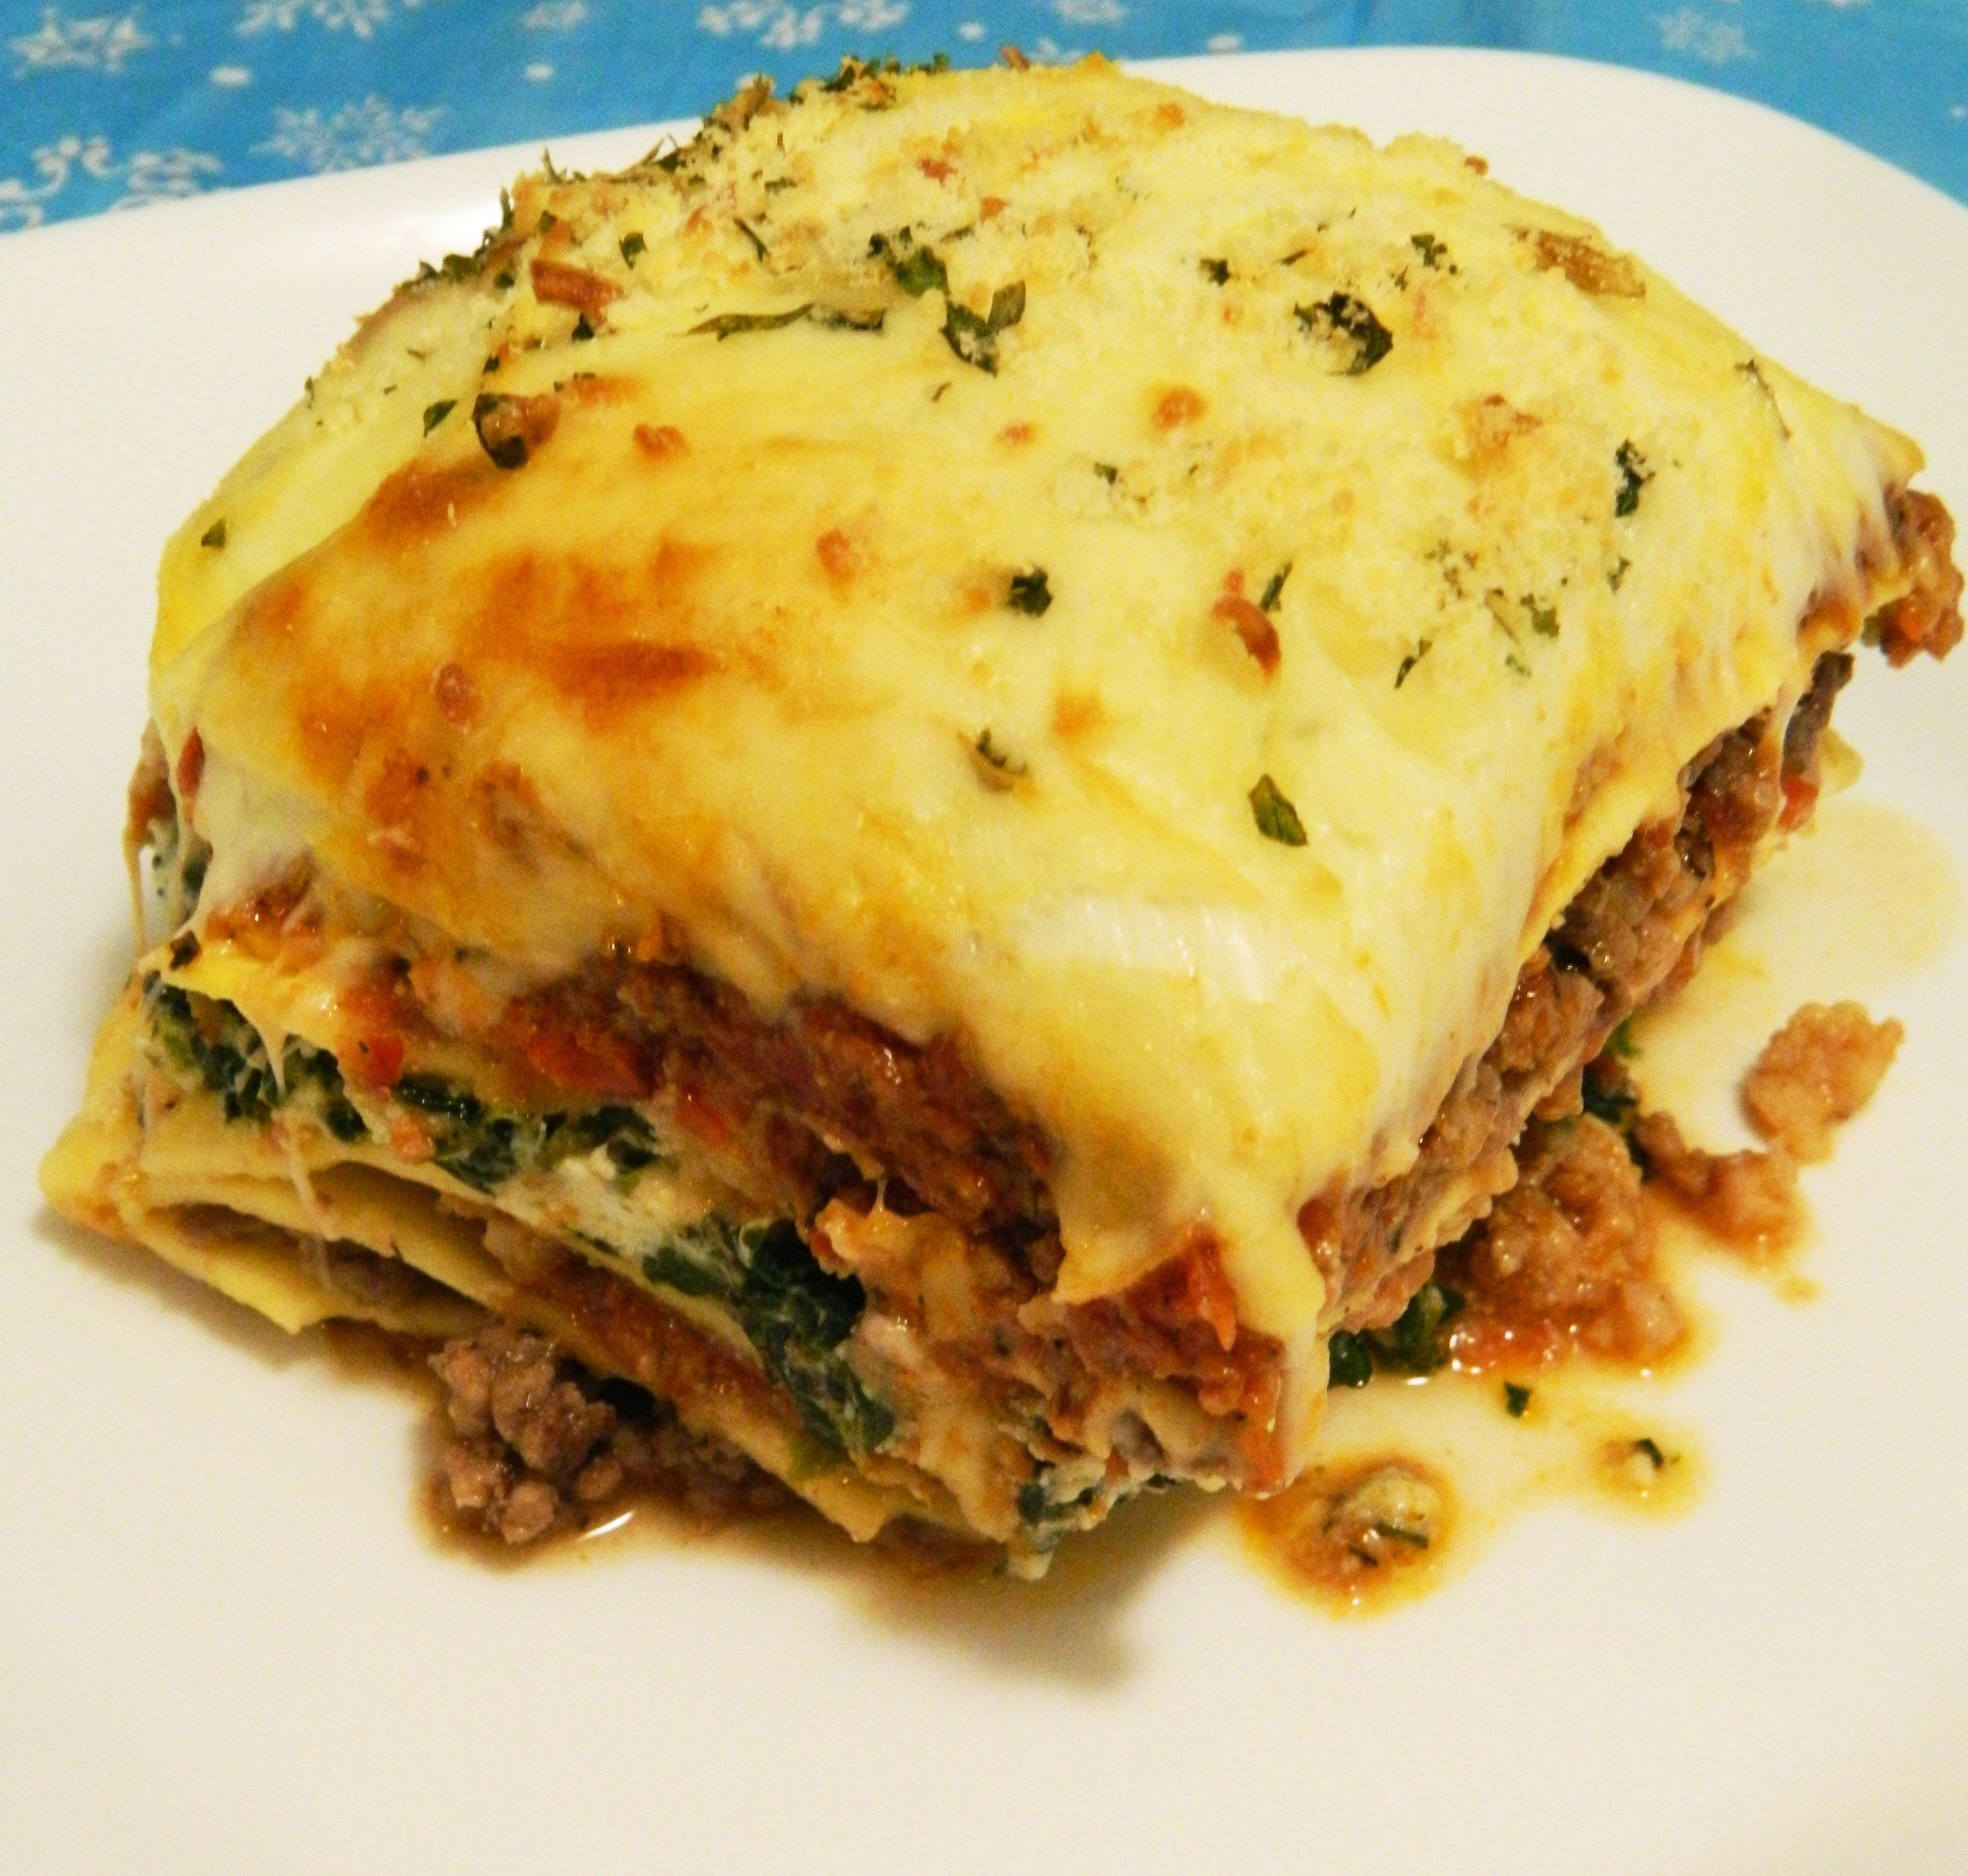
This is probably Mr. Bacon’s #1 favourite meal. In fact, I believe after his first bite of this one he said lovingly (to the lasagna, not me), “Oh my god! Why are you so good????”

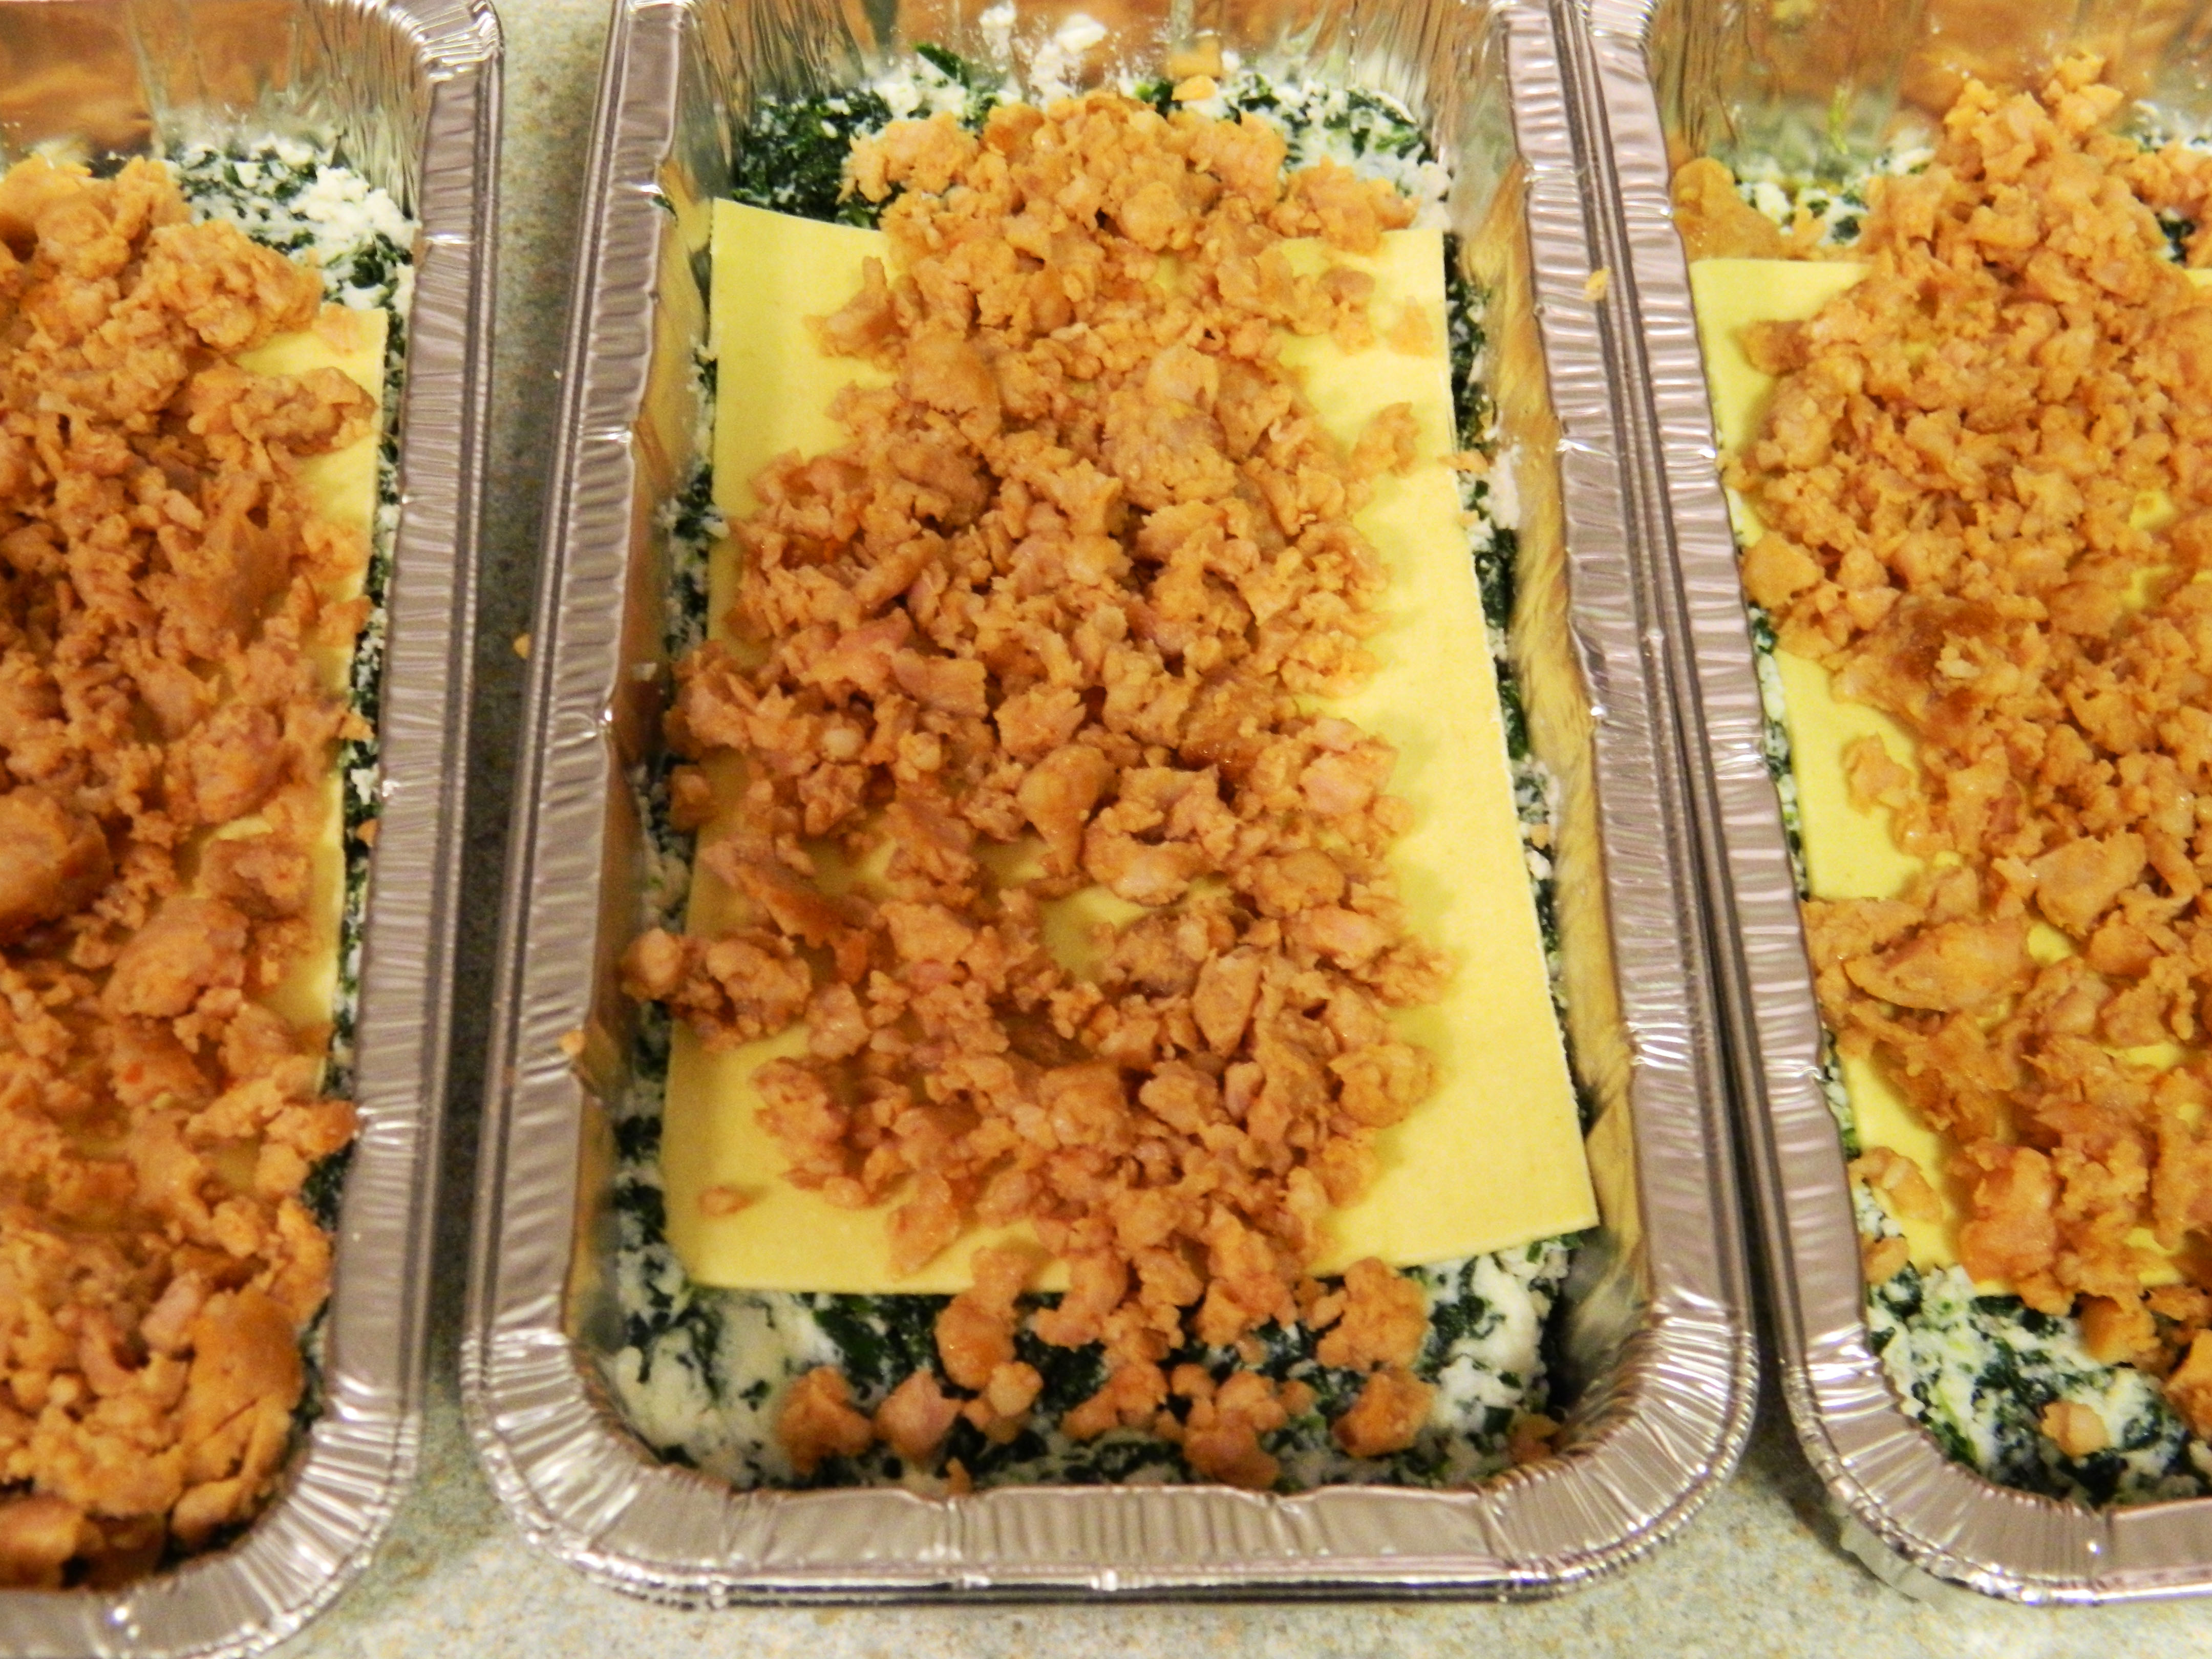
Yes, lasagna requires a fair amount of prep but my secret is that I split this recipe into three ‘just enough for two people’ mini loaf pans which means zero effort aside from defrosting and heating for subsequent meals. You could easily make this as a family size lasagna in a single 9×13 pan or you could double the batch and make six at once. They freeze wonderfully and in fact, I think they’re better once they’ve had a chance to sit.

Homestyle Lasagna

Homestyle Lasagna | baconavecbacon.com

1 package of FRESH lasagna noodles
1 pound lean ground beef
1 pound mild or hot Italian sausage
5-6 cups pasta sauce (use your own or bottled)
1 tub ricotta cheese
1 block chopped frozen spinach, defrosted & drained
3 cups shredded mozzarella cheese
parmesan cheese
2 tsp oregano
2 tsp basil
2 tsp chopped garlic
salt & pepper
dried parsley

In order to make this as painless as possible, do like the chefs do and get your ‘mise en place‘ ready. That means preparing all of the elements and placing them within reach.

First I brown the ground beef with the oregano, basil, garlic and a bit of salt & pepper. I drain it and set it out on a plate covered in paper towel to drain further.

Then I brown the sausage breaking it up as much as possible. If your sausage comes in a casing vs. loose, remove it from the casing before cooking. When it’s brown, I usually whiz it with the food processor a bit so that the consistency is closer to that of the ground beef. Set it on a plate with paper towel like the beef.

Then defrost the spinach in a medium size bowl in the microwave. Drain as much water as you can from it by pushing on it with a paper towel and allowing the excess water to drip out of the bowl. Add the tub of ricotta, a pinch of salt and pepper and 3-4 tablespoons of parmesan cheese. Mix until thoroughly combined and set aside.

Open your pasta sauce, grate your mozzarella and get your pan or pans out. Open the package of pasta and use a very sharp knife to cut through all layers of pasta in three evenly sized portions.

Your kitchen counter should look like this:

Homestyle Lasagna | baconavecbacon.com

Now you can begin building your lasagna one layer at a time. When I’m splitting lasagnas into three pans, I do one layer at a time over all three pans. Here is how to assemble it:

  • 1/4 cup of pasta sauce in the bottom of the pan
  • 1 sheet of pasta
  • 1/6th of the ground beef
  • 1/4 cup of pasta sauce
  • 1 sheet of pasta
  • 1/6th of the sausage
  • 1/4 cup of pasta sauce
  • 1 sheet of pasta
  • 1/3 of the ricotta mixture
  • 1 sheet of pasta
  • 1/6th of the sausage
  • 1/4 cup of pasta sauce
  • 1 sheet of pasta
  • 1/6th of the ground beef
  • 1/4 cup of pasta sauce
  • 1 sheet of pasta
  • 1/4 cup of pasta sauce
  • 1 cup (or more if you desire) mozzarella cheese
  • sprinkle of parmesan
  • sprinkle of dried parsley flakes

Homestyle lasagna | baconavecbacon.com

I like to have a dryer lasagna with defined layers but if you prefer yours more sauce-y, add more sauce at each layer. It’s OK if some of the ingredients fall off of the layers and into the edges of the pan. You won’t be able to tell once it’s been cooked.

When you have all three lasagnas assembled, place the mini loaf pans onto a cookie sheet and place in an oven preheated to 375 degrees for about 40 minutes. The lasagnas should be bubbling and the cheese should be nicely browned.

Let the lasagna sit for about 10 minutes before cutting.

For the ones you’re going to freeze, let them cool on the counter while you stuff your face. Then place each lasagna, pan and all into a 1 gallon ziplock freezer bag. Use a straw to suck out any air and seal tightly before popping in the freezer. When you’re ready to eat a frozen one, let it defrost in the fridge overnight or over a couple of days. Then cut into four slices, place onto a plate and heat in the microwave until hot. Trust me, it works better than the oven!

Recipe: Crock Pot Broccoli Cheese Soup

9 Jan

It’s gross out. Snow/rain/slush/damp/dark. Ugh.

Days like this call for super easy recipes that are warm and comforting. With a rich and velvety texture, this soup makes an excellent winter meal with a side of crusty bread.

Crock Pot Broccoli Cheese Soup

Broccoli Cheese Soup | baconavecbacon.com

1/2 small (450 g) jar of Cheese Whiz (I used the low fat kind)
1 can Campbell’s condensed cheese soup (feel free to sub other cream based flavours)
3 small heads broccoli, cut into small florets (about 2 1/2 cups)
1 carrot, grated
2 cups half and half
1 teaspoon paprika
1 teaspoon freshly ground pepper

1 cup milk (1 or 2%)
1 cup cheddar cheese, shredded

Toss the first 7 ingredients into the crockpot, stir and cook on high for 2 hours or until broccoli is tender. Add the milk and cheese then whiz with an immersion blender. If you prefer a chunky soup, you can skip the blending step.

Recipe: Boursin Mashed Potatoes

27 Dec

So this isn’t even really a recipe, it’s more of a method to get beautifully creamy, sinfully delicious herbed garlic mashed potatoes with the least amount of effort possible. I did this to the mashed potatoes we made for Christmas dinner on a whim and all six of us agreed that mashed potatoes have to be done this way from now on. But only for special occasions given the calorie count!

Boursin Mashed Potatoes

6-8 potatoes (preferably yukon gold or russet), peeled and cubed
1 wheel (150 g) of Boursin Garlic & Herb cheese (Costco sells a two-pack for a very reasonable price)
1/4 cup milk

Choose your method of cooking potatoes. Either boil in salted water on the stove top till soft OR microwave in a glass bowl covered with plastic wrap on high for approximately 10 minutes, stirring once. Then let stand for 5 minutes.

When the potatoes are soft, either place in a stand mixer, or use a hand mixer with the milk and cheese and whip with medium power until well combined and fluffy. Serve immediately.

Recipe: Microwave Caramels – Two Ways

21 Dec

Those who are dedicated Pinterest surfers like I am have likely noticed the slew of microwave caramel recipes floating around. These are my versions and they’re so tasty, I’ll never go back to slaving over a pot with a candy thermometer again. Because the recipe calls for basically half a can of sweetened condensed milk, I decided to make two batches: one apple cider & cinnamon, and the other salted whisky flavour. Waste not want not, right?

This recipe is so quick and simple and makes such a great neighbour or hostess gift. I hope you’ll agree!

Microwave Caramels Two Ways

Apple Cider Caramels | baconavecbacon.com

For both versions you’ll need:
1/4 cup of butter
1/2 cup sugar
1/2 cup brown sugar
1/2 cup sweetened condensed milk (Eagle Brand)
1/2 cup light corn syrup
1 teaspoon vanilla

For the apple cider and cinnamon version add all the ingredients to a large microwave safe bowl as well as:

1 packet of Lynch hot apple cider mix
1 teaspoon cinnamon

 Heat on high for 6-8 minutes, stirring every 2 minutes and pour into a well greased 8×8 or 9×9 pan. Dust the top with a bit more cinnamon and let cool in the fridge before slicing. 

For the salted whisky add all the original ingredients to another large microwave safe bowl as well as 2 oz. of Forty Creek whisky. If you’re not a whisky fan, this could work really well with spiced rum. Again, heat on high for 6-8 minutes, stirring every 2 minutes before pouring into a well greased pan. Sprinkle coarse sea salt over the top before refrigerating. 

Whisky Salted Caramels | baconavecbacon.com

I like to use my handy bench scraper to get nice straight clean lines when cutting the caramels.

You can either cut them into individual pieces and wrap each one separately (painful) or you can cheat like I do and cut them into about 5 long strips and wrap them in waxed paper for cutting as you eat them. Once packaged they should be kept refrigerated. Take them out of the fridge for about a half hour before serving. 


A Merry and Bacon Filled Holiday to You

20 Dec

First came the fireplace channel.

Then came the Swiss Chalet Rotisserie channel.

Now fire and and even better food have joined forces for your holiday enjoyment: the bacon fireplace channel.

Happy holidays!